Monday, January 30, 2012

Tips for Teaching Elementary Ceramics Without a Kiln


I've been thinking about clay lately. So far, I don't have access to a kiln. Other Art teachers, who are just trying to help with a "can-do" attitude, have offered the advice of "Get the high school Art teachers to fire it for you!" Well, when I have 750ish students, and they have waiting lists for Art courses, you can bet that their kilns are too busy firing work for their students to consider firing my students' work. But, there is good news! I am hopefully going to be getting a kiln by next fall! The fire marshal has approved a spot in the boiler room and one of my principals is excited and working on getting funding lined up for me. I don't even care too much that there are a bunch of stairs to get into the boiler room. All I asked him was who to check with to see if a location would be approved and he jumped right on board and took over making all the phone calls. Now I'm supposed to pick out a kiln (I'm told I want a computerized Skutt kiln?) and give him a price range so he can work out the funding. 

*If you are curious about any of the projects pictured here, view my post from last spring: http://artteacheradventures.blogspot.com/2011/08/finished-clay-projects.html

In the mean time, I'm still working without a kiln. So here are a few tips I've come up with in my long, 2 1/2 year career.
  1. No talking with clay in your hands. The best way to do clay projects with my school schedule is one class period for wet clay and one class period to paint. To help students focus and finish on time, my rule is that there’s no talking while working with clay. The students are so excited that they really don’t mind working silently. (Most of the time.) I try to play music or read a book like “The Pot that Juan Built” by Nancy Andrews-Goebel while they work.
  2. Buy Air-Dry clay- If you can afford it. Some people say that there is no difference between air-dry clay and regular earthenware clay but I disagree. I order air-dry clay and when dry, it is harder and sturdier than the earthenware clay leftover from the previous teacher in my position.
  3. Cover basic skills but plan sturdy projects. Avoid attaching long, skinny pieces without support. It’s ok for the projects to be a little thick. Thick = Sturdier.
  4. Paint dry pieces. Obviously glaze is not an option with no kiln, but painting works well. I’ve used tempera and even watercolor. Just remind students not to use too much water or they will start to rehydrate the clay.
  5. The most important tip: Emphasize the process over the product. I know that being unable to fire clay projects leaves them in a fragile state and probably more than one project will be dropped in the hallway on the way home and shatter beyond repair. Because of this, I really emphasize to my students that the most important part of the lesson is learning the skills and getting practice. When pieces break, the students are sad, but I can remind them that we’ll work with clay again next year and they still learned a lot.


Do you have any no-kiln-available clay tips? If so, please share in the comments!


Saturday, January 28, 2012

Kindergarten Dancers

Katie Meets The ImpressionistsThis lesson started off with me just wanting to incorporate Dance with Visual Art. One of the KSDE Visual Arts standards is about students making connections between Visual Arts and other disciplines. I remembered that my mom had give me the book "Katie Meets the Impressionists" by James Mayhew, and when I reviewed it, I thought it might work well. It tells the story of a little girl who visits an Art museum with her grandmother and is able to climb through frames into the paintings and have little adventures with the people there. Toward the end of the book she ends up performing on a ballet stage with Degas' dancers before escaping through the frame back into the museum. *After reading to the first class, I skipped a few paintings from the book so the Kinders were more likely to still be interested when it got to the dance scene at the end.

We talked about dancing and watched some short video clips of ballet performances on YouTube. I actually found a ballet based on Degas' paintings but ended up focusing on a clip from Swan Lake since it showed the male dancer doing lots of lifts and I wanted to show that it's not just "girly". Everyone was impressed with the skill of the dancers. Next, we talked about our joints and how they let our body bend and move. We practiced moving our necks, shoulders, elbows, wrists, hips, knees, and ankles. I think this is important- the students are much more likely to try to draw what they see when they are reminded of this. Finally, the students took turns posing like dancers in the giant frame while their classmates made gestural (as gestural as Kinders get) drawings of them, trying to show movement.


In the next class, students who hadn't had a turn posing got their chance and the students either added costumes to their first drawings or made a new drawing of a dancer using oil pastels.  These were more about the process than being gallery-worthy finished pieces. I am still developing my philosophy of teaching and so far it's just been "a little bit of everything"- giving the students a little guidance but sometimes keeping my distance so they can discover and do things their own way. 
I'm guessing this is dancers doing a lift.
This is by one of my PreK students. :)
They all found their own ways to show movement.

This student actually sort of made a gestural drawing using crayon!

Tuesday, January 24, 2012

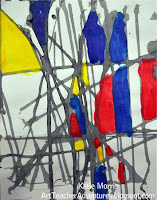
Messy Mondrians

Kindergarten at my school, as I'm sure they do in many schools, studies a letter a week. A couple months ago for "M" week, I wanted to do an Art lesson that incorporated the letter. At first I had "magenta monkeys" in my head but I never came up with a lesson I was excited about. Then one day I had some extra liquid paint from a lesson with paint droppers and not wanting to waste the paint, I decided to play! I came up with an idea that I really like: Messy Mondrians.

Most classes used paint droppers* to drip horizontal and vertical lines of black paint across their papers in the first class, after the Mondrian introduction and discussion, of course. In the second class, they were given only the primary colored tempera cakes to paint in their shapes.  A few classes used cardboard to stamp horizontal or vertical lines and colored with primary colored crayons. I prefer the dripped artwork over the stamped but uneven scheduling with two classes, and students who were too chatty in another, meant changes were necessary. I wish I would have checked the diluted paint for the droppers more carefully because I added a little too much water and it ended up gray instead of a rich black..
*Some people might think I'm a little crazy for giving Kinders paint droppers. For the most part it was fine. I did have one little mishap. As I was describing how you only need to squeeze a little bit of paint at a time on the edge of your paper and let it drip to the other side, I was holding a dropper full of paint in the air in front of me, and a little boy who can't always control his impulses shot his hand out and squeezed the dropper, splattering black paint all over the table and one little girl's paper. He immediately said "Sorry!" but I was stubborn and didn't let him use his dropper independently since he had shown poor judgment. At first he was upset but I went on helping other students and told him when he was calmed down, I would help him. He came to get me a few minutes later and I had him direct me as I dripped paint exactly where he pointed for one side of the paper, then I held the dropper with him and let him squeeze the paint on the other.

The last 2 years I've done a collage Mondrian lesson with Kindergarten. The students took some of the elements of Mondrian's artwork (primary colored squares and rectangles and black "lines") and arranged them in their own composition. I think I was getting a little bored with it and wanted to try something different. (I just saw a mixed media Mondrian lesson on Artopotamus that was pretty cool!)

Sunday, January 22, 2012

Modification, Differentiation, and Adaptation via Artful Artsy Amy


I just read a great post, Modification, Differentiation, Adaptation and the Art Classroom , over at Artful Artsy Amy and I suggest you check it out! She has put together a categorized list of ideas to help you help your students in a fair, discreet, respectful way.


My best tip in this area has to do with students who are color blind or have trouble differentiating colors. I actually got this idea from one of the 5th grade teachers at my school a couple years ago. We used it for one of his students my first year of teaching and I just pulled out the trick a couple weeks ago when a new student started. The idea is to assign a "Color Buddy". This would be a friendly, helpful student who sits near the student with color trouble and helps them find the colors they need when it is important to the assignment. 

Now go read the post over at Artful Arty Amy and add your tips in the comments!

Nick Jr. Does Art Appreciation

I was watching Nick Jr. this morning while my son played and was excited to see a little segment, Mighty Fine Art, where Moose and Zee talk about "Moose-terpieces" in an Art museum. I couldn't find the videos on YouTube but I did locate 4 of them on Nick Jr.'s website. I think these short videos would be great to use with Kindergarten or 1st grade. Check them out!

Thursday, January 19, 2012

Kindergarten Tint and Shade Triangle Trees

Oh, Pinterest, you give me so many ideas.
Source: purlbee.com via Katie on Pinterest

I saw this quilt pinned a couple months ago and right away knew what I would do with the idea. I love how simple and graphic it is and the strong shape. A big part of the Kindergarten math curriculum at my school is learning the 5 basic geometric shapes (circle, square, triangle, rectangle, ellipse) and I like to support that however I can. Last year we did wax-resist pyramid paintings for "triangle" but I wanted to try something wintery this year, and this was an easy 2-3 class period project.
Day 1: Using tempera to paint 4 different greens. 
1. Green right out of the bottle
2. Mixing yellow and blue
3. Green with white added- TINT
4. Green with black added- SHADE
Before painting, students folded their papers hotdog and hamburger style to make a "t" down the middle. Reviewed paintbrush technique but not cleaning since no water is required for this as long as you do the shade last. Just rinse brushes at the end of class!

 Day 2: Make some trees!
We discussed the quilt picture, students identified the shapes, and pointed out the different colors and patterns. I asked the students to tell me what they were looking at a picture of and most said "Christmas trees" (it was December, after all), and I used that opportunity to put in a quick science lesson about evergreen trees. Next, we cut the papers into 4 sections and I showed how to cut triangles. I gave students the choice between drawing triangles first or "drawing with scissors". I tried to get them to cut their first 4 triangles so big that they touched the top AND the bottom of the painted paper then they could use the scraps to make "baby" trees. I had pre-cut, or more like chopped since I definitely didn't measure, some brown pieces for trunks. We covered "just a dot, not a lot" for glue bottle use and they went at it.

*Tip- Save the painted paper scraps for students who missed the painting day.
Day 3: Some students would have had time for this at the end of the 2nd class but I decided to utilize "peer tutoring" and have them help struggling classmates with their gluing instead. In the beginning of the 3rd class, we reviewed different kinds of lines and practiced drawing them in the air with our fingers. I have no actual proof, but I'm convinced that getting the kinesthetic action helps the students remember it better. And it's a little silly and fun. After our practice, the students used construction paper crayons to add patterns to their trees. I told the students about shadows and gave a 30 second demonstration. Most tried to add shadows then added other details in the background. I had a couple students who missed the first 2 classes so they just made construction paper crayon drawings of patterned trees.

Skills/Concepts Learned or Reviewed: Geometric Shapes, Cutting, Gluing, Lines, Patterns, Color Mixing, Tints, Shades, Thinking about Composition
This student said she made a whole forest. 

It may look like this student was just being sloppy by gluing every scrap of paper she could find onto her background, but she had a whole story about how all the trees in her forest fell down. 

I love the letters on this tree!
*I forgot to say earlier that this is doable as a sub plan. I was there for every painting class but was gone for one afternoon of gluing and another afternoon of adding patterns. I was afraid it might turn out too cookie cutter but I think it's ok since nobody traced anything and the students were free to add whatever colors and patterns they wanted on trees they placed wherever they wanted.

Tuesday, January 17, 2012

KS YAM Updates and Personal Timeline Grad Assignment

First of all, are some YAM updates for Kansas Visual Arts teachers. 
If you happen to be a high school teacher, the Harry Hart Memorial Senior Scholarship entries are due to Lynn Felts (lynnfelts@cox.net) by January 31st.
Our YAM celebration has been on the last Saturday in February in recent years but this year it will be held March 31st at the State Capitol. Make sure you get your student art entries to your area reps by March 10th if you cannot deliver it yourself on March 30th (the night before the display.)
You can read about our Youth Art Month plans here: http://kaea.com/yam.html
Our YAM rep, Shawny Montgomery, has put together a handy little booklet with instructions, ideas, samples, and forms.

And now because I don't want a post without a picture...
Last week I started taking my 2nd graduate course working toward my Master's in Art Education. The class is History, Theories, and Philosophy of Art Education and our first assignment is an introductory personal timeline kind of thing. I thought since I spent so much time on it I would go ahead and share it here! It was hard to decide what to put on it. If you've been reading for a while, you know I tend to ramble on a bit. My husband says it's because I don't know how to edit. I say it's because all the details are important to me!

The photos with white outlines are mine, black outlines are student's work.

Monday, January 16, 2012

Romare Bearden Inspired Artwork- 5th Grade

The only handprint turkey I've ever been excited over!
My 5th grade students made artwork inspired by Romare Bearden. I had thought about doing a project inspired by him since I started teaching but hadn't found just the right inspiration yet. I read that the Nelson-Atkins Museum in Kansas City was having an exhibition of his work, Romare Bearden stamps were being released, and his 100th birthday would have been last September so the timing seemed right.

(Feel free to send me a letter with these stamps.)

To begin the project, I showed a PPT (from a website that apparently no longer exists). The students discussed some of the artwork and I pointed out how he assembled his images from different materials. I really emphasized that he used images to construct NEW pictures instead of just cutting and pasting whole images and that the scale did not have to be "correct." I also showed the following video because I liked how they compared improvisation and play between jazz and Art.
The assignment requirements were to create a mixed media work of Art about music. The students had to include something cut from newspaper or magazine (or both), something cut from construction paper, something hand drawn, and at least one instrument from the collage sheets I created. To make the collage sheets, I asked our music teacher to save catalogues for me. I went through and cut out tons of pictures of instruments then laid them out on the copy machine. I did not group the instruments by type (woodwinds, brass, percussion, etc.) though that might have made it easier for students to find specific instruments they were looking for. I put them together however they fit on the copier and enlarged to create different sizes.
These were organized at one point...
 I thought we could do this project in 2 class periods, and some were pretty much finished in that amount of time. However, I did add a 3rd class to the schedule to let more finish, and several students asked to come in during recess to work on their projects. I think that's a sign of a popular lesson- students giving up recess! In the 3rd class period, students used watercolors to fill in white space, and wrote an artist statement when they were done.
Yesenia312 says this about his/her art...
I did my art to represent Romare Bearden art. I was inspired by his art. He is a great artist. I found out about his art by Mrs.Morris, she showed us his art on the internet and thats how I figured out, and why I did it.

This might be my YAM entry...
Grace3554 says this about his/her art...
I really liked the way this came out. Better than I imagined it! I didn't want to just paint everything, I wanted to make it colorful. Some things, as you can see, I made them so you have to think about. Like the girl playing the violin. That's her left hand. Thanks for reading this!
This student said her band was named "The Toasters". I didn't notice they were missing the 2nd "t" until last night.
I love this one. I wish he hadn't missed the last class so he could have finished.
I like the watercolors on this face.
"Music is Art" became a popular phrase to add to the projects.
Told ya so.
This student named his band and put thought into their environment.
Cole1264 says this about his/her art...
I made a jazz collage with pencil, paper, magazines, and paint. I learned that almost everyone can be artistic. I like my picture and think the best part are the players.
Questionable placement of the lady's hands but unintentional.
I like how the fingers were cut out and put over the sax.